Looking for an artist
-
Teh_DarkJokerWolf
- Legendary

- Posts: 4997
- Joined: Sun Jan 16, 2005 8:54 pm
- Mood: Disappointed
No, I started it long before you said anything. I started making that the very day she first posted.SabreWereWolfQueen_84 wrote:Well, I guess I'll just tear up the one I started for her since someone did it after I told her I'd draw the picture for them, but.....oh well....
And I'm sure she'd want to see yours, too, as would I.
-- Vilkacis
-
Darth Canis
- Legendary
- Posts: 423
- Joined: Thu Dec 09, 2004 11:23 pm
- Location: Gainesville Florida
The little girl who always wanted to fly an x wing and be raised by wolves... Come to think of it she still does.
I'm glad you like it 
It was a lot of fun to make, and I learned a lot, too.
Believe it or not:
This is only the third drawing I've done entirely on the computer.
This is by far the largest and most complicated picture I've ever drawn.
It's the only full-body pic I've ever done.
The only female I've ever drawn (which is why it looks masculine with long hair thrown on).
The first time I've ever worked with such dramatic lighting.
The first time I've worked with more than one light source.
The first time I've tried my hand at hands (I'm not overly happy with them).
The first time it ever took me more than 8 hours of work to complete a drawing (it took me several times that).
Heh. Each PSD file weighed in at over 250 megabytes, and I had 16 of them by the time I finished. Remind me never to use 200 dpi when using a canvas that is 40 inches by 30 inches for a picture that's going to end up cel-shaded in the end. Both that size and resolution were completely unnecessary.

Yes, this was very much a learning experience, which is something I value greatly.
-- Vilkacis
It was a lot of fun to make, and I learned a lot, too.
Believe it or not:
This is only the third drawing I've done entirely on the computer.
This is by far the largest and most complicated picture I've ever drawn.
It's the only full-body pic I've ever done.
The only female I've ever drawn (which is why it looks masculine with long hair thrown on).
The first time I've ever worked with such dramatic lighting.
The first time I've worked with more than one light source.
The first time I've tried my hand at hands (I'm not overly happy with them).
The first time it ever took me more than 8 hours of work to complete a drawing (it took me several times that).
Heh. Each PSD file weighed in at over 250 megabytes, and I had 16 of them by the time I finished. Remind me never to use 200 dpi when using a canvas that is 40 inches by 30 inches for a picture that's going to end up cel-shaded in the end. Both that size and resolution were completely unnecessary.
Yes, this was very much a learning experience, which is something I value greatly.
-- Vilkacis
-
Darth Canis
- Legendary
- Posts: 423
- Joined: Thu Dec 09, 2004 11:23 pm
- Location: Gainesville Florida
-
Teh_DarkJokerWolf
- Legendary
- Posts: 4997
- Joined: Sun Jan 16, 2005 8:54 pm
- Mood: Disappointed
Oh...ok then, I will get started on it and thanx Darth Canis
Last edited by Teh_DarkJokerWolf on Wed Jul 06, 2005 9:45 pm, edited 1 time in total.
-
Lupin
- Legendary
- Posts: 6129
- Joined: Sun Jun 19, 2005 11:26 pm
- Custom Title: Ninja BOFH
- Gender: Male
- Location: 29°30.727'N 98°35.949'W
- Contact:
Ouch, the largest PSD I have right now is 1/10th of that size, it's the panoramic picture of the hoover dam.Vilkacis wrote:Heh. Each PSD file weighed in at over 250 megabytes, and I had 16 of them by the time I finished.
I can't wait to see it.SabreWereWolfQueen_84 wrote:Oh...ok then, I will get started on it and thanx Dark Canis
I don't suffer from lycanthropy, I enjoy every minute of it! 
-
Mercedes_Maxwell

- Pack Leader

- Posts: 49
- Joined: Thu Jul 07, 2005 4:49 pm
- Location: The Canadian Boonies
- Contact:
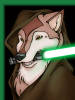
Thank you very much for your complementMercedes_Maxwell wrote:Vilkacis, I just wantd to compliment you on your picture as well and also comment that you did that all vector style! I've tried so many times to do vector drawings and they never work for me
As for my process, these are effectively the same steps I took to color the Darth Canis picture:

Once I had completed my sketch (the Darth Canis sketch, that is. This one is stolen from Allen, as I'm sure you know), I floated the whole thing into a new layer, then set that layer to multiply. If I were being serious, I would have cleaned it up a bit and gotten rid of all the artifacts.

I then made a new layer for each base color and filled them in appropriately. All of the color layers are underneath the outline layer so as not to disturb the sketch. I don't really worry about getting the right colors; just put in something close, because it can be changed effortlessly later.
At this point, it looks really, really flat.

Next, I made a new layer for the shadows above all the color layers. I set this one to Multiply as well. I selected a relatively light gray and started filling in the shadows. If the gray ends up not being quite right, it's really easy to adjust using brightness/contrast. The important thing at this step is not to think just about where the shadows should be, but also where the light should be (both are important). I usually curve my shadows, rather than allowing sharp angles. The shadows don't always have to make sense. I often outline things or put shadows in just for contrast.
Now it looks a lot less flat, but it's still missing something to give it the depth it needs.

Next, I made another layer above that and set it to Soft Light. I chose an even lighter gray and started filling in the highlights. Highlights often look best when next to shadows, or on high points in clothing. Again, sometimes I use the highlights to make things stand out, even if there wouldn't be a highlight there in reality. For certain things (such as dull clothing), you may want to adjust the highlight to a darker shade than the rest of the highlights.
Now it's not flat anymore ^_^

At last, stick in a background and make final adjustments. I usually wait until this stage to get the base colors 'just right,' since it's really easy to just use the Fill tool on the appropriate layer. You don't get the benefit of seeing this step, because my choices were retroactive. I had different colors in the beginning, but you've only seen my final choices.

Finally, size it down to the correct size. I always work with a much larger canvas than the final product and then size it down (this is essentially anti-aliasing). The final result tends to look better that way, in my opinion.
Throughout this process, as long as you keep in mind exactly where the light source is, the shadow and highlight steps tend to be very systematic.
-- Vilkacis
-
Hamster

- Legendary
- Posts: 1761
- Joined: Mon Jun 13, 2005 12:13 am
- Location: right here, where I'm sitting
- Contact:
Vilkacis wrote:Thank you very much for your complementMercedes_Maxwell wrote:Vilkacis, I just wantd to compliment you on your picture as well and also comment that you did that all vector style! I've tried so many times to do vector drawings and they never work for me
As for my process, these are effectively the same steps I took to color the Darth Canis picture:
Once I had completed my sketch (the Darth Canis sketch, that is. This one is stolen from Allen, as I'm sure you know), I floated the whole thing into a new layer, then set that layer to multiply. If I were being serious, I would have cleaned it up a bit and gotten rid of all the artifacts.
I then made a new layer for each base color and filled them in appropriately. All of the color layers are underneath the outline layer so as not to disturb the sketch. I don't really worry about getting the right colors; just put in something close, because it can be changed effortlessly later.
At this point, it looks really, really flat.
Next, I made a new layer for the shadows above all the color layers. I set this one to Multiply as well. I selected a relatively light gray and started filling in the shadows. If the gray ends up not being quite right, it's really easy to adjust using brightness/contrast. The important thing at this step is not to think just about where the shadows should be, but also where the light should be (both are important). I usually curve my shadows, rather than allowing sharp angles. The shadows don't always have to make sense. I often outline things or put shadows in just for contrast.
Now it looks a lot less flat, but it's still missing something to give it the depth it needs.
Next, I made another layer above that and set it to Soft Light. I chose an even lighter gray and started filling in the highlights. Highlights often look best when next to shadows, or on high points in clothing. Again, sometimes I use the highlights to make things stand out, even if there wouldn't be a highlight there in reality. For certain things (such as dull clothing), you may want to adjust the highlight to a darker shade than the rest of the highlights.
Now it's not flat anymore ^_^
At last, stick in a background and make final adjustments. I usually wait until this stage to get the base colors 'just right,' since it's really easy to just use the Fill tool on the appropriate layer. You don't get the benefit of seeing this step, because my choices were retroactive. I had different colors in the beginning, but you've only seen my final choices.
Finally, size it down to the correct size. I always work with a much larger canvas than the final product and then size it down (this is essentially anti-aliasing). The final result tends to look better that way, in my opinion.
Throughout this process, as long as you keep in mind exactly where the light source is, the shadow and highlight steps tend to be very systematic.
-- Vilkacis

That is cool! WOW! I'm going to try that! Thanks for using my picture.
-
Teh_DarkJokerWolf
- Legendary
- Posts: 4997
- Joined: Sun Jan 16, 2005 8:54 pm
- Mood: Disappointed
-
Darth Canis
- Legendary
- Posts: 423
- Joined: Thu Dec 09, 2004 11:23 pm
- Location: Gainesville Florida
-
Kzinistzerg
- Legendary
- Posts: 2335
- Joined: Thu Feb 03, 2005 6:28 pm
That's the same way i've started doing it- the picture is my sig used to be a 1024x768 picture, and before that, it was 2000x2000 pixels. i've done some drawings that ended up looking pretty good because i did it that way.Finally, size it down to the correct size. I always work with a much larger canvas than the final product and then size it down (this is essentially anti-aliasing). The final result tends to look better that way, in my opinion.
-
Anubis

- Legendary
- Posts: 6429
- Joined: Tue Jun 21, 2005 7:57 pm
- Custom Title: Eletist Jerk
- Gender: Male
- Location: Crossroads, ganking a hordie lowbie.
- Contact:
hey thats me!!Vilkacis wrote:Thank you very much for your complementMercedes_Maxwell wrote:Vilkacis, I just wantd to compliment you on your picture as well and also comment that you did that all vector style! I've tried so many times to do vector drawings and they never work for me
As for my process, these are effectively the same steps I took to color the Darth Canis picture:
Once I had completed my sketch (the Darth Canis sketch, that is. This one is stolen from Allen, as I'm sure you know), I floated the whole thing into a new layer, then set that layer to multiply. If I were being serious, I would have cleaned it up a bit and gotten rid of all the artifacts.
I then made a new layer for each base color and filled them in appropriately. All of the color layers are underneath the outline layer so as not to disturb the sketch. I don't really worry about getting the right colors; just put in something close, because it can be changed effortlessly later.
At this point, it looks really, really flat.
Next, I made a new layer for the shadows above all the color layers. I set this one to Multiply as well. I selected a relatively light gray and started filling in the shadows. If the gray ends up not being quite right, it's really easy to adjust using brightness/contrast. The important thing at this step is not to think just about where the shadows should be, but also where the light should be (both are important). I usually curve my shadows, rather than allowing sharp angles. The shadows don't always have to make sense. I often outline things or put shadows in just for contrast.
Now it looks a lot less flat, but it's still missing something to give it the depth it needs.
Next, I made another layer above that and set it to Soft Light. I chose an even lighter gray and started filling in the highlights. Highlights often look best when next to shadows, or on high points in clothing. Again, sometimes I use the highlights to make things stand out, even if there wouldn't be a highlight there in reality. For certain things (such as dull clothing), you may want to adjust the highlight to a darker shade than the rest of the highlights.
Now it's not flat anymore ^_^
At last, stick in a background and make final adjustments. I usually wait until this stage to get the base colors 'just right,' since it's really easy to just use the Fill tool on the appropriate layer. You don't get the benefit of seeing this step, because my choices were retroactive. I had different colors in the beginning, but you've only seen my final choices.
Finally, size it down to the correct size. I always work with a much larger canvas than the final product and then size it down (this is essentially anti-aliasing). The final result tends to look better that way, in my opinion.
Throughout this process, as long as you keep in mind exactly where the light source is, the shadow and highlight steps tend to be very systematic.
-- Vilkacis